Friday 31 October 2014

Harvest time for thanks...

Hi everyone, happy whatever you celebrate tonight. As a kid I loved Hallowean; I would dress up in my best witches outfit and sit in the garden watching the moon. I still remember the feeling that big bright moon gave me as my imagination chased off in all sorts of witchy things.

Well tonight what I'm going to share is about giving thanks. So as you read take a moment to remember all that is good in your life. 'Knowing' what we have right now that makes us happy, can stop the yearnings for past or present. Now wouldn't that feel good! 

I was inspired to make this because of the theme on the A Vintage Journey challenge blog which is Bountiful Harvest. There are some amazing creations from their DT which you can view here.

A few weeks ago I bought an old frame and some bits and bobs from a second hand shop with a mind to alter it at some time. Today I dismantled it, removed the picture from the back board and assembled my collection of dried flowers nuts etc.


I don't have any leaves in this collection so hand cut a few. I used distress ink in Barn Door, Cordroy Walnut Stain and Shabby Shutters.


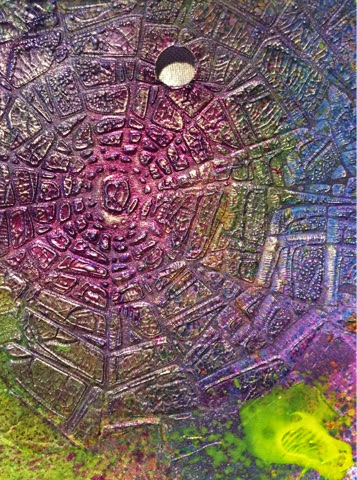
I chose to work directly onto the back board and gave it a coat of Gesso. To this I stencilled some crackle paste through a Lin Brown stencil and some words from a Dina Wakley. The colour is from what was left on my stencil from earlier which reactivated with the crackle paste.


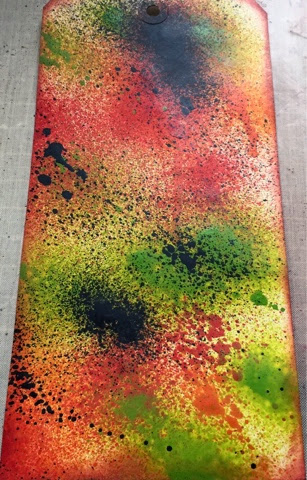
I sprayed this with Media Line sprays in Greeny Yellow Yellow And Turquoise and when this was dry sprayed with color bloom in old Leather


I sprayed some shimmer Media Line in Magenta and arranged my elements, once happy I stuck them in place.


I then added my sentiment which is a poem by William Blake and stamped some leaves from Lin Brown 07


Thanks for the visit, see you soon,

Debsxxx


SHARE:

A journal Page! it's been a while...

Hello everyone, I hope you are well, and if not get better soon. I'm under the weather with sore throat achy body and generally feeling Yuk! I'm still in good spirits though!.

I'm on a challenge frenzy at the moment, I have not been entering for a while because of all the drawing and felt the need to play with some different Art and mediums. So today I did a journal page and I'm going to enter it into these challenges 

The craft Barn Q&L whose words are Hug and Nowhere. The idea is to create a piece of art, and add a quote or poem, lyrics or a song etc. which feature at least one if not both words. Stumpt for ideas then look at the samples here 

That's Crafty whose new theme is hot and spicy. I had to laugh at this as all I could think of was curry because that's just how I like it lol. You can see how the DT interpreted the theme here 

Artist Trading Post (ATP) theme is any old iron . Ruth set the theme with a photo of an old rusty door she had seen on holiday and the DT came up with fab inspiration! Take a look here 

I found a page in my journal which I had played with previously 


The photo is upside down so it will look a little different. I layered stencils and spray inks in tones of reds yellows and orange to give it that hot and spicy as well as rusty look.


I stencilled a figure for more interest and continued to build up my layers of paints and stencils. 


And to finish I added my words from 'hi ho  Silver lining' recorded by Jeff Beck  here's a link to YouTube 


I had so much fun thanks for stopping by and hope to see you soon ... 

Only it didn't look finished so I added some Frantage in Ocre in a couple of places and stamping round the edge almost proving a frame, and some script.

Now it's finished!


Debxxx


SHARE:

Wednesday 29 October 2014

I know another one!

... Just a quick hello and over to tag.

Over at Mixed Media Place blog, the challenge is to created with a limited Pallate of black white grey and one other colour and at Dragon's Dream the theme is Red and the letter D, now doesn't red go good with black and white I thought. In addition at speed craft challenge where you complete a project in 15 mins ask for a Hallowean theme, hense my third tag.

I got very carried away and forgot to take photos, but I set my timer to go and started by spraying DecoArt Media a Spray in black and white on to a #8 Manila tag. I quickly dried this and then using black soot distress ink I darken areas on the tag and with a diamond shape stencil removed some ink with a damp cloth. I again sprayed black and white and this time a squirt or red. Again dried this and moved it to one side. I  stamped the skull onto some smoothy card I heat set and then coloured areas in red acrylic ink. I added some shading with a stabilo All pencil. 

I stamped some bugs drew a gravestone in black and edged in grey. Stuck my skull on and added some embellishment. 


I had only seconds to go until my 15 mins was up but I did make it.

Thanks for the visit and see you soon

Debsxxx


SHARE:

Colours of sweet Autumn

Hello and welcome. Thanks for coming by, I appreciate you taking the time to visit, with so many amazing blogs out there it's so hard to choose where to to go. Lol!

While taking photos of something I cannot show you, I arranged these around it as I thought they were just scrummy.


This gave me an idea for a tag so here we go.

I am going to enter this into these challenges.


I started with a size #12 Manila Tag which I coated in Fresco Acrylic Paints from Paper Artsy colours, Pumkin Soup and Brown shed


For some texture I used Grunge Paste through a script stencil, once dry I added DecoArt Media Shimmer Mister in Turquoise and yellow.


To this I added more Grunge Paste which I had tinted by adding Hey Presto and Chartrues through a Lin Brown stencil.


I started to play with the elements to see where I wanted them placed 


and once happy stuck them to the Tag.


I also die cut a dragon fly from Sizzix which comes with an embossing Plate - I chose not to use it this time, instead, I sprayed it with DecoArt Media spray in Yellow green and Yellow and Cyan.  I loved the colours, so vibrant! This got added to the tag.


To finish I added some bling, and coloured fibres. I also added a red bow, as the colour draws the eye in, says Dina Wakley on her radiant faces video.


I loved making this and really had to stop myself filling it up with more of everything lol. Right I'm onto another and will see you again soon,  take care! 

Debsxxx


SHARE:

Tuesday 28 October 2014

Sewing...

Hello everyone, I recently made some felt out of which I made a cover for my phone.


Well I've changed my phone and so now it doesn't fit. No problem I think, I'll sort it out. So when my order had arrived from Janet Humphrey it was the perfect time to make a new one to use while I alter the other.


I stumbled across Janet on Lin Brown's blog which I was reading at the weekend. Please check what Lin does it really is worth a visit. I'm looking forward to more of this style from Lin (please).

In the pack was calico so I cut it to the size I needed. This I laid out and on top, I placed pieces of material to fit. I sewed with a zigzag stitch across each piece as it meets another, forming a layer of patchwork. I guess you wouldn't normal make patch work this way but it suited me.


Once complete i embellished here and there with lace and bows etc. I then cut more material to form a back and stitched round 3 edges making sure right side to right were facing. I turned it inside out and poked out the corners. I formed the size of case I needed and using an embroidery stich sewed around the edge to form the case.


I really enjoyed making this case, it turned out far better than I imagined and I love it's shabby look. Think I'll be playing like this again soon. 

Any way bye for now, take care 

Debsxx


SHARE:

Monday 27 October 2014

Another Tag

Hello everyone, I hope you all had a good Monday. I often struggle on Mondays but today was beautiful. I was lucky enough to work from home this afternoon and sat in my dining room with the French doors open. It was warm with a slight  breeze and felt so pleasant.

I played again with Decoart Media spritz paints onto a tag that I will be entering into A Vintage Journey challenge. The theme is Hallowean - to die for. The rules is that you must use a die cut out on your project and be in the style of Tim Holtz.

So to recap - I first used Wendy Vecchi's crackle paste through Tim Holtz layering tag shattered glass. Once this was dry I sprayed the tag with Yellow, Yellow Green, blue, and once dry Magenta which has mica in it to give a lovely shimmer


I love these close ups of all the colour


 I used the same stamp of a spider and skull from Dylusions bits of this and a die cut of a pen nib from Tim Holtz to add the hat. I added some treasure gold to the pen nib and finished with a silver pen to outline things. 

Next I stamped a sentiment and added this to the tag.


Very similar to yesterday's but with a different colour palette. Thank you for your visit and see you you soon
Debs xxx


SHARE:

Sunday 26 October 2014

Halloween 'Howl....'

Hello everyone, thank you for popping in to see what I've been up to, especially as you are probably expecting a face, but surprise I've made a tag. Lol!

Many of the challenge site have their theme as Halloween and I've been pretty stuck for ideas that was until today. This morning I was looking a Vintage Journey Blog and in particular the 10 excellent tags Astrid created which you can see here . I was particularly excited by this one I loved the crackle paste and the effect it gave her tag. 

I grabbed a coffee and sat thinking how I could used something similar on a tag for Halloween. I also wanted to play with my new DecoArt Media spritz paints.

I am entering this tag into the challenge at Artist Trading Post and That's Crafty 

I picked a size #10 Ranger tag and sprayed it with Red Green Orange and Black. I dried this with a heat gun. 


I added some distress ink in Barn Door and Peeled Paint to the red and green areas as well as round the edge.

I used the Tim Holtz layering stencil Shattered glass and applied Wendy vecchi crackle paste through it to create a web effect. Once dry I went round the paste with my stabilo All and activated the ink rubbing it into the cracks. This picture is blurred but gives you an idea.


On the other side I used another TH stencil with Grunge Paste.


I stamped the skull from Dylusions plate 'bits of this' onto a piece of smoothy card which had been painted in Snowflake from PA. I stuck this onto the card and added some bugs from the same plate.
I drew the bat as I didn't have a stamp. 


To finish I added a sentiment and some fibres.


Thank you for your visit and come back soon 

Debsxxx


SHARE:

Tuesday 21 October 2014

She went from pretty to interesting

Hello, I found a box of 48 Sukra aquelles which came free with a mag subscription, and as I haven't used them thought I'd give them a go.

I started loosing defining a face, well what else! I didn't have a plan so she sort of created herself. I used a variety of colours from the Sakura pencils to add colour but then got engrossed and reached for the prismacolors.


I liked the composition but wasn't happy she was too pretty for the mood I was in; I needed to make her darker. I cut her out and with media line paint in Night from Dina Wakly painted another sheet of card. I started darker and worked my way light. I wanted the back ground to match my shading. I stuck her down and added more shadows with the  Stabilo all. 


I think she looks far better now. Not so pretty, her nose has gone a bit weird but what she lacks in perfectionism she more than makes up for in interest. I hope you agree, and if you don't, or you do I'd love to hear it. Take care for now 

Debsxx


SHARE:

Monday 20 October 2014

Radiant faces 7

Hello welcome to my Monday night play. On Radient Faces lesson 7 was with Dina Wakely. I love her open style it's so full of colour and expression. Her girls always have a story to tell. 

I loved doing this but boy did I find it challenging, although it was so enjoyable. I am so glad I signed up for this workshop I think it is one of the best I have done. 

Any way my girl, I pretty much followed Dina's way she demonstrated.

I started with some tissue and painted on some Media line acrylic paint in sky lime and yellow.


 I placed a stencil underneath the tissue and rub an oil pastel over the top. I used to make rubbings in this way as child on trees, lol.


Once this was dry I used a stencil ontop in night 


This was then put to one side to dry. I continued a piece  of white card by adding magenta and yellow, then placed a stencil on top and rubbed some paint away. I allowed this to dry then dribbled some acrylic ink in magenta. As this dried I picked up some of the ink and used it in a face stencil.

Unfortuantly I forgot to take photos so will talk you through it. Once the background was dry using a Stabilo all pencil, I drew my girl. Using the patterned tissues I filled in her top. And here she is


Thank you for looking, take care, and come back soon 

Debsxx


SHARE:

Sunday 19 October 2014

Radiant faces lesson 6

Hello here is another of my faces

Created using graphite and prismacolor. Background a mix of Inktense pencil in violet and caran D'Ache   crayons in various shades of mauve.


Thank you for looking 

Bye for now Debs xx


SHARE:
BLOGGER TEMPLATE CREATED BY pipdig