Saturday 31 May 2014

JOFY number two

Hello again! If you read my previous post you would have seen I wasn't very happy with my last post. Well this is attempt two.

I used the two same colours as Jo, on her post for the paper Artsy blog in the week. This time I decided to use a tag and draw my flowers so that I could paint them. 


I added leaves, which I painted in the undiluted Teal and used Chalk for the flowers. 


I built up the layers of the flowers using a water brush which I let dry in between. Once the white was finished I added a watery Teal to the flowers to add some depth. I put this on with a dry brush and then baby wiped off. 


Lastly I used a bottle top in a very watery Teal here and there to finish. 


I like this one better! Thanks for looking. Take care Debs xxx
SHARE:

JOFY inspired board

Good morning everyone. It is 08:52 on a lovely Saturday morning and I've been out to play already. Now I know this might not be early for some, but those that know me, know I like to rise later when I can. I'm often torn between what my body wants (sleep) and what my mind and spirit wants (play), that I end up doing neither and waste that moment of my life in a dilemma. Note to self, stop thinking and just do, and it's ok to change your mind.

Therefore, when I woke at 4:30 today, I watched TV in bed for a while! (I do not recommend, as TV at that time in rubbish! ) and then finally hobbled down the stairs into the garden to enjoy the sunshine and flowers. Hobble you might ask? Yes hobble! I sprained the tendon in my knee on Wednesday evening, slipping on wet decking. 

The sun was so warming and it was peaceful with only the sound of the birds chatting in the trees. The flowers reminded me of Jo's lovely picture frame and block she created for the Paper Artsy blog this week. I really loved the simple look Jo achived with only two colours from her limited addition range. it was really scrummy! See how Jo made hers.

I thought I could do something similar and enter the challenge, so using a limited palette of vintage lace and pansygot started.  I didn't have any stencils like jo's so used this one from PA003{ELB}

I used the vintage lace to cover my background and pansy for the flowers.

To add some pattern I used the home made stamp from playfoam, in pansy. This filled some of the gaps. 


I was not liking it at all! The card I used was the wrong shape. I felt that what I had created looked like the background, on which a focal feature would be placed. It looked like something was missing! 

I borrowed flowers from the Easter wreath I made for one of my turns on the Paper Arts Blog and separated them as I stuck them to the board. I finished them with pink pearls in the centres.


I still feel as if there is something missing but decided to leave it alone for another day! If you have any ideas please leave them in comments. Thanks for looking and I'll see you later. Take care Debs xxx

SHARE:

Wednesday 28 May 2014

Another sewing day

LlMorning lovelies, a dark and raining morning here, almost wish I could stay snuggled. Today I have a quickie post for you about my sewing days at the weekend. I started with some placemats for my kitchen table. I used squares from a charm pack for each one. 

I used 6 for each one and backed then with a medium calico. Inside I used 1/4 inch batting to add a little depth. I sewed right sides together leaving a small gap to turn the mat right side out. I then stitched a 1/4 inch top stich around the edge and then sewed diagonally across the squares to give a quilted look. 


Next I lined a bag which mum had crochet.  She made loads of granny squares and joined them with a contrast colour. She added a strip all round to give the bag some depth.


I used a pretty cotton for the inside which had been fused to a very stiff backing this was then sandwiched with some contrasting cotton on the outside of the inside lining.


I added a pocket to hold a phone and pen. 


The lining was then placed in the bag and hand stitched into place. The handles were made from the same material as the lining. It makes a great bag for work as it is big enough to take all the junk I carry around.


And finally another bag. This bag was in a magazine that I buy. I transferred the sizes to a paper pattern and followed the instructions.


I started with the straps but as you can see the tension wasn't right. I discovered this was because I used a different thread for the bobbin. I changed the bobbin and used the same thread and it was perfect.


The top parts of the bag were lined with a non fusible lining which I stuck with spray glue. All four pieces were pinned and then sewed together. I didn't take too many pictures but will make another with full instructions.

Once all pieces have been sewn together you then join the two sides matching right sides and lining making sure you match the seams as they are seen once finished. Stich all the way round leaving a small gap to be able to turn ride side out. Then top stich around the the top edge to hold in place. On this bag I did this wrong as I top stitched each individual piece so when sewn together it produced a pucker either side. (Learning as I go ).


The bag is reversable I used contrasting colours in the same tones but you could use different materials to give a completely different look.


Thanks for your visit see you soon Debs xxxx

SHARE:

Tuesday 27 May 2014

Kate inspired

Hello, good evening to you. Thanks for visiting tonight, I'd love it if you hit the follow down button below; I do have a lovely group of followers but would love some more. 👍

Earlier I had time for a play before I started dinner. I've been very busy with making bits and bobs which I will blog about later, and have had very little or to be honest inclination, to get messy and inky out in the garden. I sat there yesterday afternoon and could not think of anything I wanted to do. However, today I was straight out there and did a journal cover inspired by Kate Yetter.  I didn't have a spare journal but do have lots of loose pages so thought I'd put them all together and give them a front and a back.

Kate is one of the new guest designer's on the Paper Artsy blog and she brought us a lovely project decorating a journal cover. You can see Kate's and how she made it on the blog. I followed Kate's most of the way but felt mine was missing something and so carried on. I'm really pleased how it turned out, and I now have the back to my book.

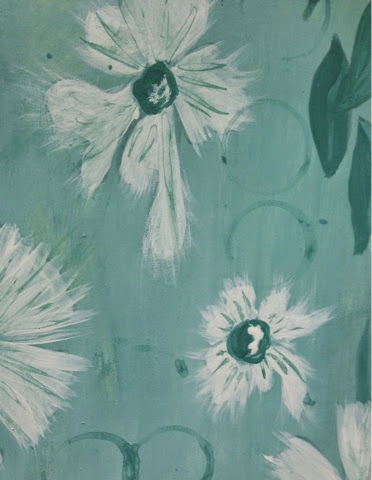
I used the same colours as Kate  for the first layer Fresco Acrylics in sage and guacamole but then I used spray inks from dylusions and Adirondacks. I let them drip but then for no reason I shook them from side to side and this is what I got - I loved it!


I had to stop myself from carrying on in this way but will go back to it on another project. I really wanted to produce something using the techniques that Kate gave us. I added some stamping and then my white to the middle, however, I laid it over the ink which is water based and not meant to set so it mixed with the white which was from Paper Artsy who have several whites - this one was chalk, and so I got different effect.


This was two coats of white and then blended out as it reached the edges. On top of the white I added a stamp in black archival from the Lynne Perrella Collection 028 


I blended underneath the stamping but felt it needed more so used frantage in taupe to add some texture without bulk.


This was finished with some leaves to add some framing. 


This I will enter to Paper Artsy blog challenge. I also played around with photos cropping the board to gain different effects, I will print these to use on different projects. Here are a few


.


I hope you like this board and would love to read your thoughts.

Take care for now and hope to see you soon. Bye bye Debs xx

SHARE:

Thursday 22 May 2014

Tag Box using Lin Brown stamps

Evening my 3Fs (family, friends and followers) I hope you have had a good day and are looking forward to another long weekend. It's my turn on the Paper Artsy blog tonight with this tag box.

It's a quicky project that won't take you long so I'd love you to have a go, enter your make on the PA blog here and be in with chance to win one of the lovely stamp plates.

Here is a sneak peak 


I hope you like,  and would love to read your comments both here and PA blog. Thank you for your visit take care Debs xxx
SHARE:

Saturday 17 May 2014

Karen inspired Tag

Hello and welcome. What a lovely day! Last night we stayed in a premiere inn about 90mins away from Bourton on the Water. We got up this morning and took a leisurely drive arriving about 11am.

I was blown away with the beautiful village, and would have sold up there and then to move in. That was until my Husband reminded me we probably couldn't afford one of the lovely houses and we would have no job. Technicalities!


Anyway we moved onto stow and found our cottage. Once dinner was had, I settled to have a play. I only brought limited supplies so really had to improvise. 

Last weekend Karen over on the Paper Artsy Blog gave us a lovely Clean and Simple card. Have a look at all her posts.

For mine I gessoed a tag, and once dry used a stamp to add to the background. Being in someone else's house I was mindful of not making a mess and so used a large journal as a background on which to paint the tag. The page I chose had been sprayed with dylusions ink and so as I touched the page with the wet gesso brush it pulled some colour onto the tag. I liked this and so left it.


I haven't many stamp sets on me so used these three images; I used Caran D'ashe Neoll to add some colour.


These were then assembled onto the tag.


I added some words to finish and yes the upside down e was deliberate. I will be entering this into the challenge.

Thank you for looking. Take care Debs xxx
SHARE:

Sunday 11 May 2014

Sewing day

Evening friends and followers. I had a day playing indoors today with the sewing machine. On Friday at sewing class I made a round storage thingy for my bathroom to hold spare toilet rolls. I chose quite a vintage looking material to blend in with my colour scheme. 

The house I live in was new 10 years ago and like many modern houses lacks the characture of older houses. As I have grown older I'm drawn more and more to quirky looking homes. We do plan to move  one day but for the moment our home suits us. However, I have given myself the task to take each room as a project and fill it will homemade furnishings and art. ( the reason for my sewing classing). 

The bag was finished at class but I wanted to add some more to it so here are before and after pictures.

This was before


And then after


And here it is in place. 


Once I'd finished this, I made a peg bag for my daughter 


I was quite pleased with this as it is lined as well.

I  then spent some tidying a bit of the garden and took more photos. 


Then I made a little storage roll for crochet hooks.


I love I now have somewhere to keep them all together neatly and I even left some room incase I get more.

I then finished another little storage box that was started at class.


And last I made a memo board with some pockets.


This is an update as I forgot to add there. Last week at sewing club we made pjs. The ones I made my pattern from were stretchy material but the material chose wasn't. Result,  they were too small ( I'll grow into them ) in the week I cut another pair larger. Today I finished them.


I hope you enjoyed your visit take care. I'd love to read your comments 

Love Debs xxx
SHARE:
BLOGGER TEMPLATE CREATED BY pipdig