Tuesday, 21 January 2014

DLP week one and two

Many of you will know about the Documented Life Project but those who don't, can find information in my previous blog.

I have been lagging behind but have added some pages to my  journal

I decorated the cover - I first jessoed the cover in white and then played with my Gelatos. Once that was dry I used a stencil and baby wipes to remove some colour you can see where I got this technique from here.  It is by Helen  Chilton

I then got out my primary elements adding colours here and there. I then played with pens and stamped some sentiments.


I have now added the week one prompt - my front door 


I printed it off onto normal copy paper and then added it to my journal page which I had brayed using Ellen Vargo's  technique and fresco acrylic paints - see Ellen's work on the paper artsy blog here.


I smudged snowflake around the door to blend it in and added some circles.


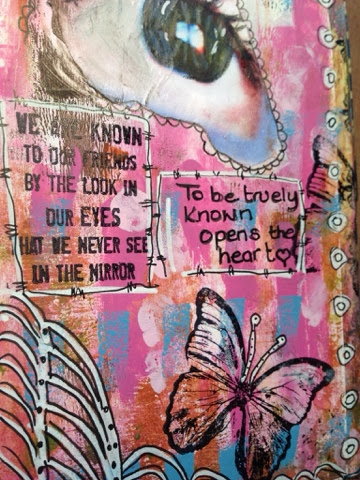
For week two it was a selfy - I thought long and hard about what I wanted to add and decided to go for my eye. I added an eye to a document and manipulated it to make it grungy but then played again 
Until I had a softer look; one I thought I could blend in.

I again used my brayered and frescos 

Loved these colours and then came my eye 

I added some blue and ginger and continued to play until I got the final look


Bit of a long post today hope you didn't get bored. Thank you for looking.

Any comments would be lovely to read x
SHARE:

Sunday, 19 January 2014

Plaque

Happy Sunday everyone, I hope you have been enjoying your day. I have been in the art room most of the day playing. I made some moulds which I ended up throwing away as they didn't do want I wanted. I will have to give that another try!

I then used some moulds I already had and made some hearts and roses to use on projects. I also played with some clay. 

Then my attention turned to my documented life journal which, I haven't touched yet. I added some extra paper to a couple of months and decorated the front. I was inspired to do this by Lorraine Bell which you can check out for yourself here for a very small fee. I will put up picture's later but want to get this post finished as I want to enter it into a challenge at Paper Artsy which you can see here.

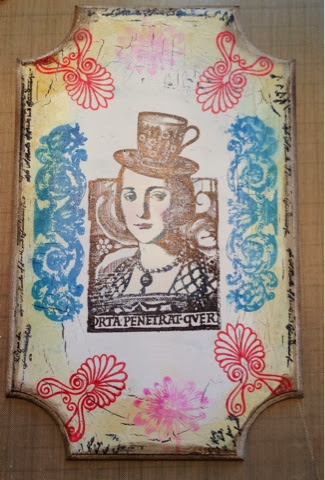
So back to my plaque. I was thinking of getting my UTEE out today so this became the perfect project.

I aged my plaque with crackle glaze and then stamped some borders and corners from the hot picks range from paper artsy. Next I stamped my centre piece. I distressed round the edge. In this photo you can see that I didn't line up the corners as well as I could which breaks the symmetry. Further on you will see that I added embellishments to off set the distraction. 


Next I added some roses and and metal embellishment. I added some treasure gold in white fire to the embellishments


then my utee. 


This is a very quick blog but I was running out of time and my OH was calling to say dinner was ready. 

Thank for looking Debx 

SHARE:

Saturday, 18 January 2014

Casket


Afternoon everyone I hope you are all having a great weekend. Today I am sharing my little casket I created following Julie Ann Lee's creation on Paper Artsy blogg which you can see here. It really is worth checking out Julie Ann's casket because it really is fab and she is so lovely.

Well my casket is full of little secrets which in my imagination is owned by a forlorn woman whoes greatest love is missing. The caskets contains a map rolled up to protect it, as it has the place marked on it, where he was last seen. There is a post card from him, telling her how much he loves her. A crumpled note requesting a clandestine meeting before he he leaves, and flower from the garden where they met. There is a a tiny bottle with a clipping of his hair, and of course a heart to represent their love.

Now that's enough of my romanticism here is the casket. All the materials used are from Paper Artsy except the glossy accents and embellishments which are from various places.

The box is coated in sage and left to dry. I then stencil flowers with grunge paste on the top and again leave to dry.


Next I coat the sides and parts of the top with crackle glaze and while this is drying, I paint my flower with a mix of sage and beach hut. I paint the box with the same colour and as it's drying watch it do it's magic. 

I coat the flowers with treasure gold and stamp onto the top and sides using stamps from this set, which I won in a blog challenge at Paper Artsy.

I'm adoring this set and have some ideas of what I want to use them for which I'll share later.


I added the flower and metal embellishment (Julie Ann creates a great feather but I felt my box was too small)


And now for the inside


Thank you so much for looking and as always would love to read your comments 
Hugs Debs xxx
SHARE:

Sunday, 12 January 2014

Room Art

...Many of you are aware that I moved my craft room from my summer house to a spare bedroom as the weather changed due to the summer house not being insulated. The bedroom is slightly bigger and comfy but it is not my summerhouse. I loved it out there in the garden as it was totally My space and held many wimsey decorations and girly things. Many of my bits of equipment was hung from the walls whereas in the bedroom I do not feel able to bang holes in walls etc.

Anyway today I played for a while and then thought I'd create something to hang on the wall to help me feel like it's my room. I had recently purchased some stamps from Chocolate Baroque and thought I'd use one to create my picture. Unfortuantly there are no steps as I got too carried way. 

The back ground is distress ink in lilac, and then edged in chipped sapphire. I made a mask from the stamp to use so that I could keep the image clean. I then laid my stencil on and used a bay wipe to remove some nil to form the back ground. I then used the stencil to add some more colour.

The image was coloured  with pencils.


I also intend to enter this into a challenge at Pan Pastels which you can find here.

Thank you for looking and as always would love to read your comments.

Debsxx


SHARE:

Saturday, 11 January 2014

Spring is on it's way

I love that now christmas is over we have spring with which to look forward . My favourite seasons are spring and autum, both of which are so full of colour. The freshness of spring always lifts my spirits and when Anita at Arty Inklings announced a new challenge about spring I couldn't resist entering. You can see the challenge here.

I purchased this heart in the week and thought it would be good to use. I painted it fresco acrylics in a variety of green starting dark and getting lighter using the ombré technique.

Then I stamped a sneaky heart from Darcy uk as spring is close to my heart; I got married to the love of my life in March. I then added some tulips again in green with differing values.

I then finished off the heart with some lace, string, a bow and some pretty yellow flowers.


Thank you for looking and I would love to read your comments.
Debs xx


SHARE:

Love is in the air

I'm entering this tag into the Artistic Stamper challenge which you can see here.

I loved playing with my Gelatos earlier today so thought I'd have another go. I started by scribbling some colours. Blended them with water and my finger. Then used some stencils with distress ink. I'm really loving playing with ink and stencils at the moment it is so much fun.


I also thought that I would enter this tag into a challenge at our creative corner which you can see here which is to use something from your stash that you haven't yet used. Well I am guilty of that many times over as I more stash than I have time to use. For this challenge I chose my birds cage from Tim Holltz which I cut from mount board.

I then used guilding flakes in peacock to give the cage some sparkle. Then I added hearts in various size to the cage.


I then added a sentiment to finish the tag


Thank you for looking and your comments would be lovely to read.
Debs xx

SHARE:

2nd Paper Artsy challenge

I loved the simple clean look that Clare Lloyd achived on her project ' a little bird told me' which you can see here. I wanted to create something similar but didn't have any of the stamps so my creation is improvised with what I do have.

I chose to do another tag; I masked off the part I wanted to use. Although this effect looks very simple it took me three attempts to get it right. The first time I over stamped and got some lines in the area which I didn't like. The second attempt was good, however, I had so much ink on my fingers I made the tag dirty and blotchy. My third attempt had me cleaning my hands and being careful not to push too hard on my stamp.

The stamp I used was ink block, which was one I chose as a prize from Artistic Stamper. I first stamped in black, then red and then lilac.

Once this was dry I chose a flower stamp and repeated  the process and then added some butterflys.i

I appreciate how keeping it looking simple can actually be a lot harder than it looks. 

Thank you for looking and as always would love to read your comments.

Debs xx
SHARE:

PA challenge 1

This tag was inspired by Helen Chilton over on the Paper Artsy's blog, you can see Helen's here.
I didn't have any water soluable oil pastels, so used my Gelatos instead. I do love playing with these and I'm still learning all the different ways to use them. 

I found some tissue paper with writing and pictures on which I liked. I tore two piece and stuck them to my tag using Claudine hellmuth matte medium. I died this off and  I scribbled with the gelatos in different colours and then used a wet finger to blend them. 

I used the diamond stencil and removed some colour with a baby wipe. This wasn't really successful so I used some distress ink and stencilled the diamond on. I liked this effect.


I then stamped my feature using Paper Artsy stamps plate ID04 which I love. I recently purchased this and this is my first play.


I added an eyelet to the hole at the top and threaded a heart and then stamped a sentiment.


And the finished tag

I really enjoyed making this tag. Thank you for looking and I would love to read your comments.xx


SHARE:

Sunday, 5 January 2014

Ooh la la

I have loved decorating this plain wooden jewellry box. I was inspired by Leandra at Paper Artsy who demonstrated a heart she had decorated, you can watch it here. She also set us challenge which closes today at 5 pm today. I was pushed for time but this is what I have come up with.

I started by painting the box in sherbet from the fresco acrylic range. I added some grunge paste but did not colour it as you can do because I knew I would be covering it in a different colour. I then arranged my elements where I wanted them.


I sprayed them with a mini mister filled with a light pinky mauve from primary elements. This was more of an experiment to start but I loved the effect.


I dried this off and went back to my fresco paints to build up depth of colour. First coat was lilac, second coat, pansy and last coat squid ink.


 I took the colour out a bit as advised by Leandra to add depth to the underneath wiping it off with a baby wipe.

I then sprayed three coats of the primary elements in pink, mauve and then purple. I mixed the colours on the top of the box so that it was all blended.

I dried these coats and then added some treasure cold in silver to the tips of the elements which beautifully finished it off.


I hope you have enjoyed looking through the photos. I would love to read your comments. 

Hugs Deborah xx
SHARE:

Friday, 3 January 2014

Teddy bear

Over on A Creative Need the January Challenge is up check it out here,  also check out the Etsy shop. Here is my inspiration for the challenge.

I got my bits together


Then assembled my card. I wasn't sure what embellishments I wanted to use, so played  around a bit until I was happy. For the teddy I used spectrum noir alcohol inks in FS4 and FS6 for the fur, and then DR1 and 3 for the ribbon. I added some highlights with a white gel pen.

The finished card


Thanks for looking 
Debsx 

SHARE:
BLOGGER TEMPLATE CREATED BY pipdig