Saturday, 19 April 2014

JOFY inspired Tag

Afternoon all. We haven't had rain here yet, and as I'm writing this the sun is shining beautifully, however it is very cold. 

loved what Jo did with her Master Board, on the blog at Paper Artsy.  it is spired me to play. I had a tag which I had brayed some colours on  which I thought would make a good back ground. I cannot remember the colours sorry, but they are Fresco Acrylics from Paper Artsy.

I cut some squares from a copy of my master board and an old book, I'm not ready cut up my masterboard yet. I added a frame cut from Tim Holtz's frameworks dies at Ranger,  as well as pictures from Tim Holtz ephemera pack, Expedition by Ranger


I didn't want to stich so chose Jo's other suggestion instead. I used a faux stich in black. I added a second line of faux stitching around the out side edge of the collage.


I then used treasure gold on the frame.


Next I added a  flower and some buttons.


And here is the finished Tag which I will be entering into the Paper Artsy Challenge 


Thank you for visiting, please leave a comment x

Deborah x


SHARE:

Friday, 18 April 2014

I got to play

Happy Good Friday everyone. I hope you are enjoying this weekend. Some of you who follow me on twitter  may remember me saying that my mum was coming today, and that I probably won't get much crafting done, as she does not stop talking. I love her to bits and wouldn't change her, but she does not stop talking! 

Anyway she came and I listened, and I crafted this.


started with an 8x8 board and stuck some different papers randomly on the board. I then added some UTEE with frantage and tiny beads. Next I added grunge paste and then stuck burlap over the top, leaving some showing.


I loved the colour of the beads and they inspired me to add more blue. I cut some flowers from the tim Holtz tattered floral die which I painted with Fresco acrylic paints from Paper Artsy.  I used Sky, Baltic blue and Inky pool


 I also cut this new die from Tim Holtz and added some treasure gold to some of the inserts.


And last I add treasure gold in white fire.


Thank you for looking and enjoy the rest of the weekend xxx

SHARE:

Tuesday, 15 April 2014

I made a coat...

Ok it's only for Daisy the name I have given my sewing machine. This afternoon I thought I would make a cover for my machine as I practice my sewing skills.

The size is 17 inch x 32 . I used cream for the insides and  a pretty pink for the top side. in between is sandwiched quilting stuff. (Don't know it's name) I then stitched satin bias tape all the way round and added some ribbon to tie it up. 


Thanks for looking - take care Debs xxx

SHARE:

Monday, 14 April 2014

The big move

Evening all. Over the last week I have been having a move about. some of you may remember I started my crafting life in the summer house. However, as the winter bedded in, I had to move indoors as my paper stash had started to feel damp. I was able to move in time, and everything was saved. 

I have never felt quite right in the house so as spring has blossomed I've moved part of my stash back to the summer house. This is a lovely space at the bottom of our tiny garden, where I feel very at home.

Here is a video of the summer house.


As you may of noticed I said part of the stash, the rest has stayed in doors. I have kept the paper and card indoors as well as dies and cutting machines. I have also put out the sewing machine and have space for material and wool.  This room now feels more spacious and once I have painted it and made a new blind I think it will feel more comfortable.

This room can be seen here.


Well that's both rooms sorted and I feel happy - thank you for taking the time to look and I would love to see your comments. 

Debs xxx
SHARE:

Thursday, 10 April 2014

Less is sometimes more

I bought this blank ATC box with a friend in mind, from a local craft store. I decided to use Madame Payraud’s 12x12 paper from docrafts. I cut all my pieces and made sure they fit. I painted the inside with fresco acrylic in sky and inky pool touched here and there to add depth. 

I then used distress ink in chipped sapphire around all the edges, and once dry rubbed on some treasure gold in sapphire. 

To fasten, I punched holes in the lid and side, and threaded a wide contrasting blue ribbon. I added enough so that the ribbon can sit under the cards and as you open the lid, raises the cards for easy access.  Now for the photos :)


Thank you for looking, see you soon. take care. Xxxx
SHARE:

Make a tag box

Good morning, I hope you are all well and enjoying the spring weather. As I write I am in the summer house listening to the birds chatter. I am trying to rid myself of a head ache so thought I'd post this Tag box I have made.

All materials are from Paper Artsy except,  distress ink - ranger, balsa wood, and lace I cannot remember. I started with the balsa wood, it has been cut into useful sizes. I assembled what I need to make a simple box to hold my ever growing Tag collection. I didn't make it very large as I wanted to make different ones as I need them. I thought this might be a good reminder of how my style and skills change over time. 

So I cut my pieces to make an internal size of 5 x5 inches or approx 12.5x12.5 cm. I used hot glue for this.

Once it was dry I used grunge paste as a filler in the corner gaps, this also added a nice texture to the corner of box - I was going for an old crate look. I then left it alone for a few days as I got bored. I picked it up again with renewed inspiration and cut some paper from Chatsworth collection to line the inside. I didn't want it too precise so as to add to the recycled look. I added some feet by adding some tiny cotton reels. 

Next I painted most of the box with fresco acrylic paint in French roast. The next layer was crackle glaze  in specific areas of across the top and sides, and once dry I coated in fresco acyrlic in mushroom. This is the first time I used this colour and I am so loving it! 

I then used a heat tool and watch the magic happen that is the crackle glaze. Lots of tiny cracks in keeping with the scale of my box appeared I was thrilled.


Once the box was dry,  I  used distress ink, in stained walnut to the edges and corners, just to add more age and weather to the box. I then stamped flowers and leaves from Lin Brown 01,  around the sides randomly, in  black archival . I heat dried them and used Portfolio pastels to colour in the flowers and leaves. I then added a lace border to the bottom.


 I also added a touch of treasure silver here and there.

And now to put the the Tags in 


At this stage I thought it was finished but wasn't happy. Something didn't look right. So I took the offend lace of a Da ..Da 


Thank you for taking the time to read this rather long post. See you next time, take care. Xx 
SHARE:

Wednesday, 9 April 2014

Journal cover

Evening crafters, on Monday at craft club we were decorating our journals. We started with building lots of layers, which we covered in Gesso. Once dry we added elements to create the look we wanted, and then another coat of gesso.


That's as far we got at club, but tonight I started to paint it. I used fresco acrylic paints from Paper Artsy in these colours. The paint gave it lots of depth.


I then dried this with a heat tool. Once dry I sprayed it with dylusions inks? I dried each colour before adding the next. To add some Shine I used cosmic shimmer. once dry I used primary elements from Luminarte in greens and blues. 


Again I dried this off and then the fun started with using treasure gold in these colours.


Thank you for visiting, I hope you come back soon.

SHARE:

Sunday, 6 April 2014

Phew made it!


Afternoon fellow crafters. This is a very quick post that was inspired by Joanne Wardle over at Paper Artsy. Check out Joannes's fab clean and simple look here

I won't go into detail as you can follows Joanne's steps on th PA blog.

I picked my stamps which were from deep red and laid in my base. I then used a circle stamp from deep red which I covered fresco paint from the JOFY limited addition colours of dolly mixture and dusty teal. Next I added some black stamping in Archival from Darcy's EDY07 which I think looks great over the deep red.


To finish I added a sentiment stamp from Artistic Stamper and as the word's design has some small smaudge/platter look I added some more to tie it all in.


Thank you for looking and please leave leave a comment 
Bye for now Debs xxx


SHARE:

Sunday, 30 March 2014

Jo Myhill inspired

Good morning lovelies, happy Mother's Day to all you mum's out there. I hope you all have a fab day.

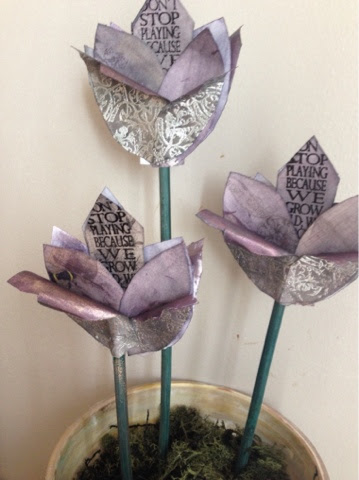
Since Jo blogged her pot of tulips on the Paparr Artsy blog I've have been itching to play along. I was blown away of how she altered the pot and the tulips looked so good. You can see the lovely Jo's here.

So here is my attempt, I showed my mum my pot and her comment was 'did you make that' which made me laugh.

I started with a teracota pot as I could not find a tin pot anywhere.


 I used most of the colours from the special addition fresco paints until I was happy with the colour. I then used the rusting powder and some embossing powers to add more texture. I added some frantage which was recommended to me as a great product by Jo and she was right I love it.


Now onto my tulips I - I decided to make three for my pot in a similar way but keeping the colours in the purple range as I wanted this pot to sit in my dining room.


And here it is - thank you for looking and as always love to read you comments xx

SHARE:
BLOGGER TEMPLATE CREATED BY pipdig